Creating a Free Self Hosted Knowledge Base for Your Law Firm Using Outline Wiki
Posted by Wetherington Law Firm | Articles
- Articles
- Artificial Intelligence
- Car Accidents
- Class Action Lawsuit
- Comparative Negligence
- Crime Victim
- Defective Vehicles
- Disability
- Kratom Death and Injury
- Legal Marketing
- Motor Vehicle Accidents
- News/Media
- Other
- Pedestrian Accidents
- Personal Injury
- Results
- Sexual Assault
- Truck Accidents
- Uber
- Wrongful Death
Categories
By: Matt Wetherington
January 4, 2023
Every Law Firm Needs a Knowledge Base
This article will teach you how to create a free self-hosted internal knowledge base for your firm using GetOutline. Because I am a full time personal injury lawyer and not a coder, it took me a lot of trial and error to get this working. I wrote this with very simple instructions and answers to the problems that I encountered when getting started.
I REALLY like Outline and you should use it. And I’m not being paid to say that. You can see a working example of an Outline wiki here. With outline, you get the following “must-haves”:
- Easily editable documents, organized into sections
- Lightning fast search from the website or Slack
- Ability to add photos and videos from any source, including direct upload
- Ability to upload word documents, pdfs, and any other file type directly to the policy or guide
- Simple URL structure with robust permission for sharing inside or outside of your firm
- Integration with google docs, zapier, airtable, and lots of other tools.
Just like my guide to Search Engine Optimization Companies, I have not received any compensation for this article and instead am trying to gain your trust by offering incredibly valuable information in hopes that lawyers reading this will be so impressed with our thoroughness that they refer their Atlanta personal injury cases to my firm. We currently want admitted liability truck wreck cases with catastrophic injuries and unlimited insurance. But we handle other stuff too.
Background
As my Atlanta personal injury firm has grown, we have increasingly had a need for a centralized knowledge base to ensure efficiency and accuracy in our work. Like most firms, we have created handbooks, policy manuals, and maintained scattered word documents as part of our failed efforts to get organized.
We even spent 8 months developing a comprehensive manual, which literally no one in the firm uses. Then we moved to Google documents, which was better, but led to fragmentation and duplication.
I eventually realized that the law firm knowledge base must be a living document that is accurate and easy for anyone in the firm to keep up to date. Wikis (like Wikipedia) are an excellent choice for a knowledge base as they allow for collaborative editing and organization of information. This means that multiple team members can contribute and update the knowledge base, ensuring that it stays current and accurate. Additionally, wikis offer various formatting options and the ability to easily link to relevant documents and resources. Onenote is another popular option for a knowledge base, particularly for law firms that use Microsoft products.
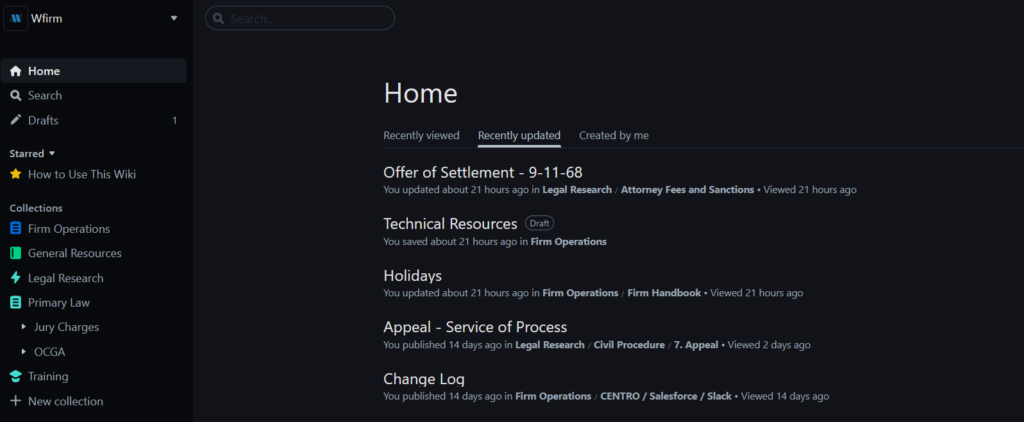
I ultimately decided to use Outline as its knowledge base due to several factors. First, the cost was reasonable (basically free). Additionally, Outline allows for real-time editing of documents and included robust permission management. It was also easily accessible through Slack, which is our primary CMS. As a result, Wetherington Law now has over 20,000 pages of content within its wiki and I am very satisfied with our current workflow and how easy it is to access each item.
Here is a screenshot of our wiki:
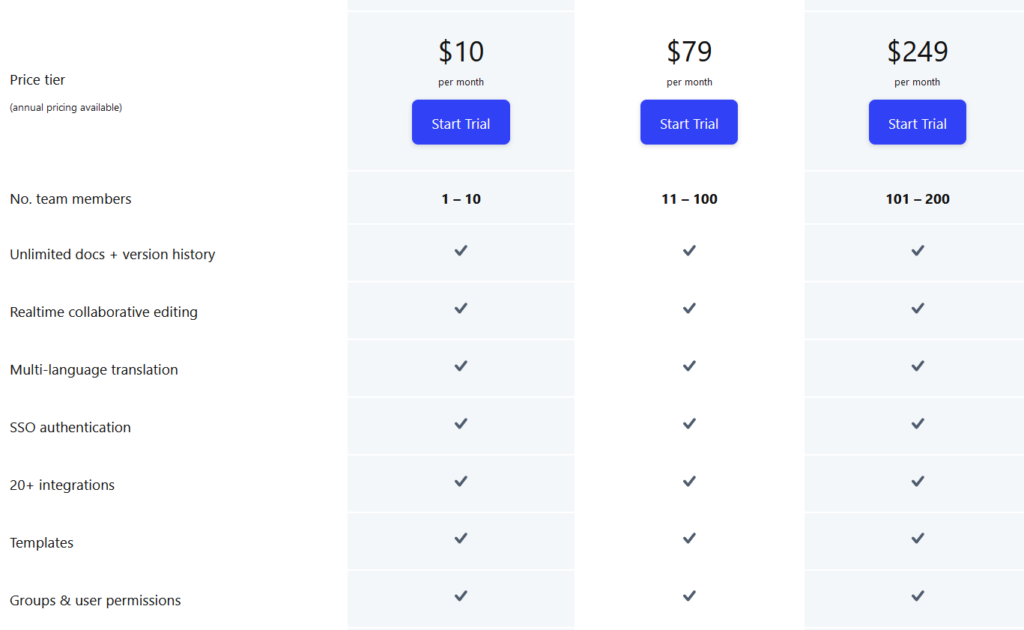
Outline offers a paid hosted version and a (mostly) free self-hosted version. The pricing structure breaks down as follows:
Before You Get Started
If you have less than ten team members, I strongly recommend that you purchase the hosted version of Outline. If you have more than ten users (or are just interested in a fun coding project) read on for a guide on how to install Outline in a self-hosted environment using Google Cloud.
This guide is derived extensively from these sources:
- Outline’s Official Self Hosted Documentation
- Outline’s official Github repository
- Thomas Griffin’s excellent tutorial for installing outline with Digital Ocean
- Tom Jorge’s also excellent guide for installing outline wiki
I am NOT a coder and I don’t consider myself a technical expert. It took a lot of trial and error to get everything right. If you are technically proficient, I anticipate it will take one hour to complete the guide and closer to three hours if you are not.
The process is relatively straight forward. We will first create an Amazon Storage Bucket, then provision a virtual server on Google cloud. Before getting started, decide whether to purchase a new domain for your wiki or to host it as a subdomain (wiki.yourwebsite.com) on your existing website.
Create Amazon Storage Bucket
1. Navigate to AWS and Create an Account. Add your billing information also. For most people, your usage will be covered by Amazon’s free tier.
2. Navigate to the AWS S3 Storage Setup Page.
3. Click ‘Create Bucket’

Bucket name: youruniquename
AWS Region: Select the region closest to you

OBJECT OWNERSHIP:
ACLs enabled: YES

Block Public Access settings for this bucket
Unselect all of the options to enable wiki access

click “Create bucket” to create your new S3 bucket.
4. On the main S3 bucket screen, find your new bucket and click on it. Then, click on the Permissions tab.

5. Scroll to the bottom of the Permissions tab and click to edit Cross-origin resource sharing (CORS).
6. Enter the following code, inserting the domain address you want to use for your wiki where indicated:
[
    {
        "AllowedHeaders": [
            "*"
        ],
        "AllowedMethods": [
            "PUT",
            "POST",
            "DELETE"
        ],
        "AllowedOrigins": [
            "wiki.wetheringtonfirm.com"
        ],
        "ExposeHeaders": []
    },
    {
        "AllowedHeaders": [],
        "AllowedMethods": [
            "GET"
        ],
        "AllowedOrigins": [
            "*"
        ],
        "ExposeHeaders": []
    }
]
Click save.
7. In the AWS search bar, type ‘IAM’ to navigate to the IAM Dashboard.
8. Select ‘Users’ from the sidebar:

9. Click Add Users:

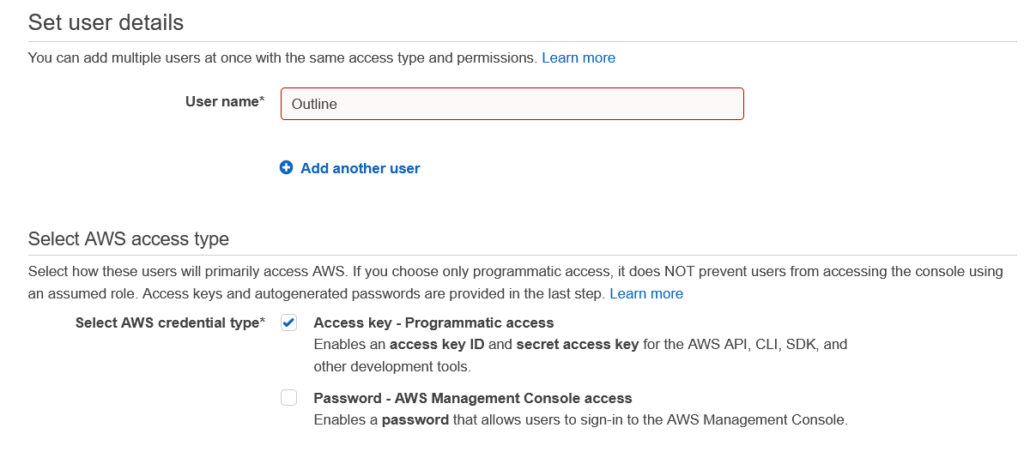
10. Create a user as follows:
User Name: outline
AWS Credential Type: Access key – Programmatic access
11. On the next screen, select ‘Attach existing policies directly’

12. On the next screen, select ‘Create Policy’

13. A new tab will open. Don’t close the previous tab. On the new screen, select ‘JSON’

14. Paste the following policy code in the editor, replacing YOURBUCKET with the name of your S3 bucket you just created:
{
    "Version": "2012-10-17",
    "Statement": [
        {
            "Sid": "VisualEditor",
            "Effect": "Allow",
            "Action": [
                "s3:GetObjectAcl",
                "s3:DeleteObject",
                "s3:PutObject",
                "s3:GetObject",
                "s3:PutObjectAcl"
            ],
            "Resource": "arn:aws:s3:::YOURBUCKET/*"
        }
    ]
}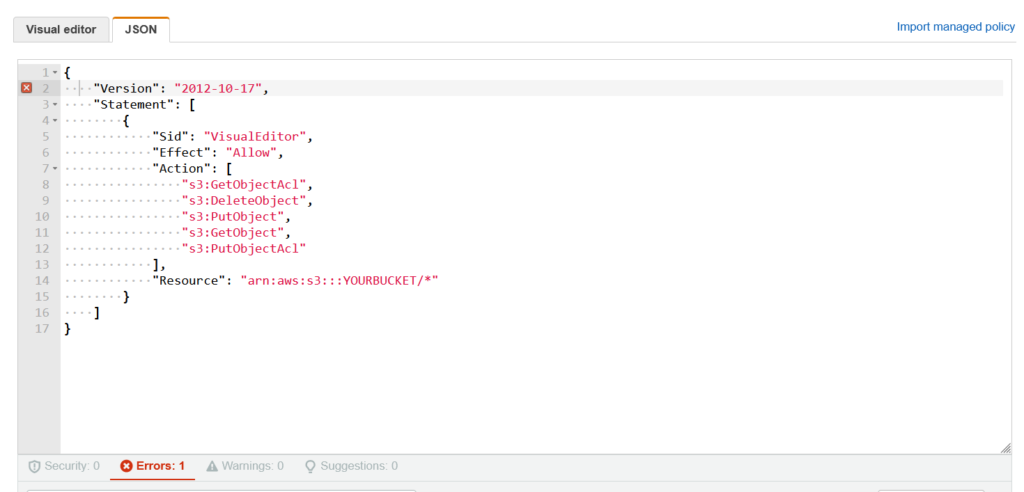
If you receive an error, like in the image above, delete the leading spaces, so it looks like this:

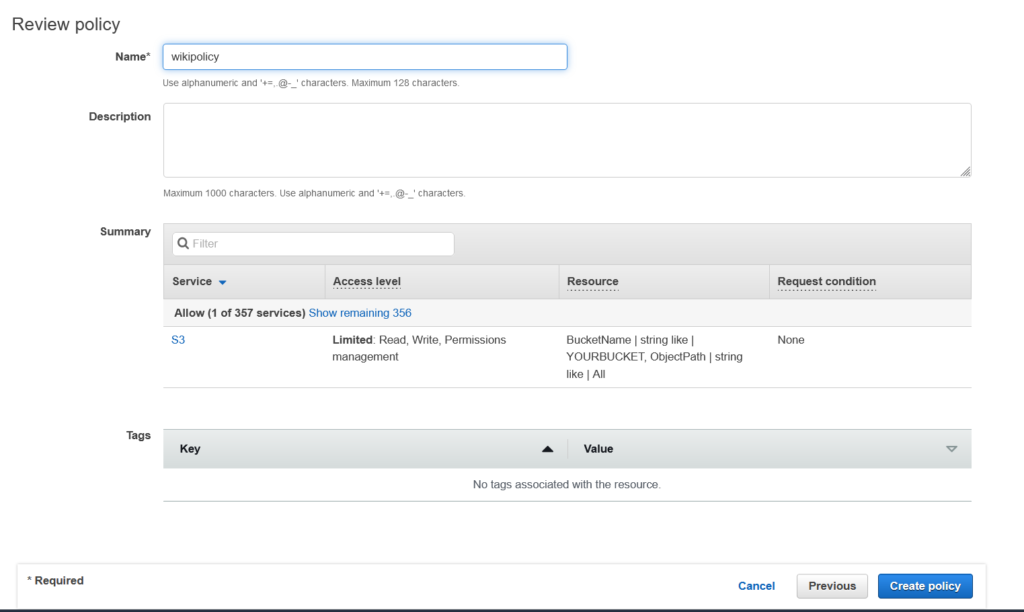
15. Click Next, then Next: Review. On the review page, name the policy and click ‘Create Policy’
16. Close this window and navigate back to the Add User page.
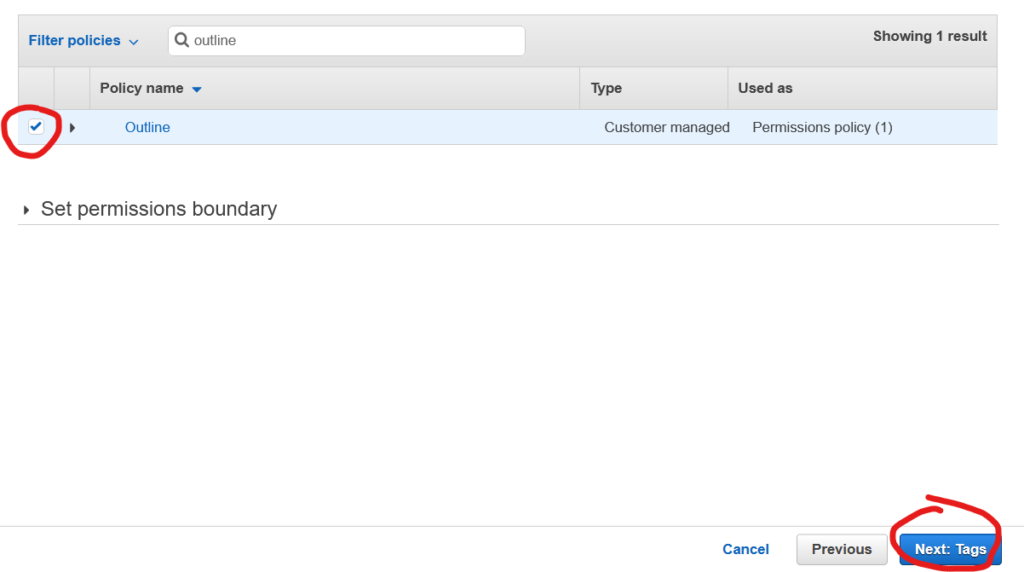
17. Click the refresh icon and then search for your new policy:

18. Select the checkbox next to the policy and then click ‘Next: Tags’
19. On the optional Add Tags screen, select ‘Next: Review’
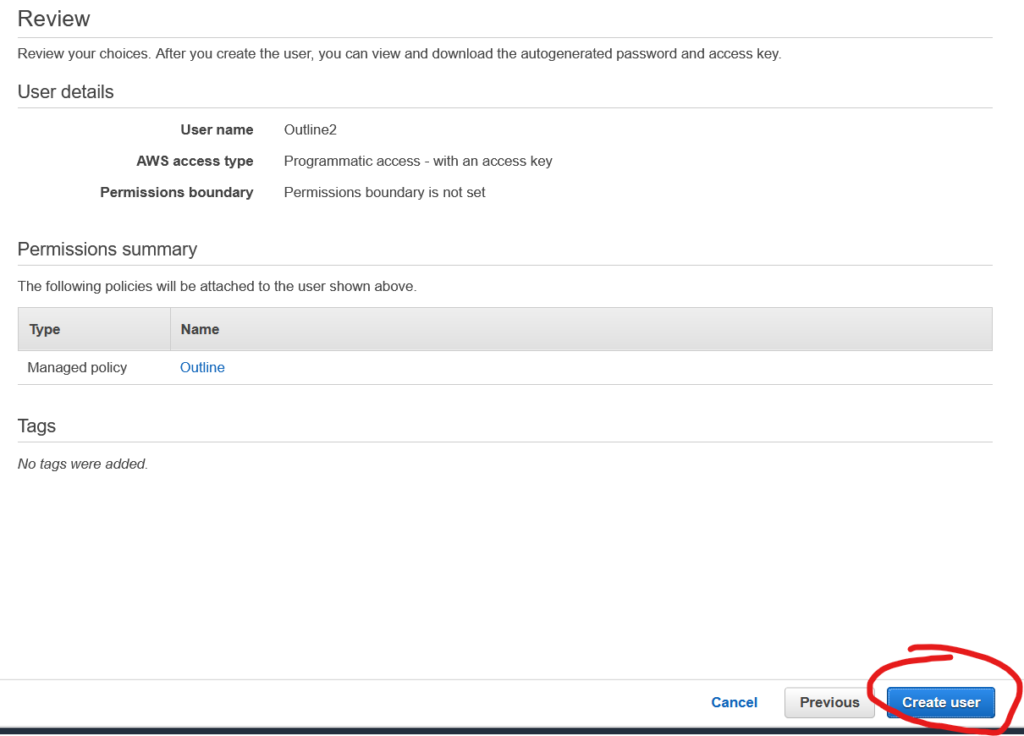
20. Review the settings and click ‘Create User’
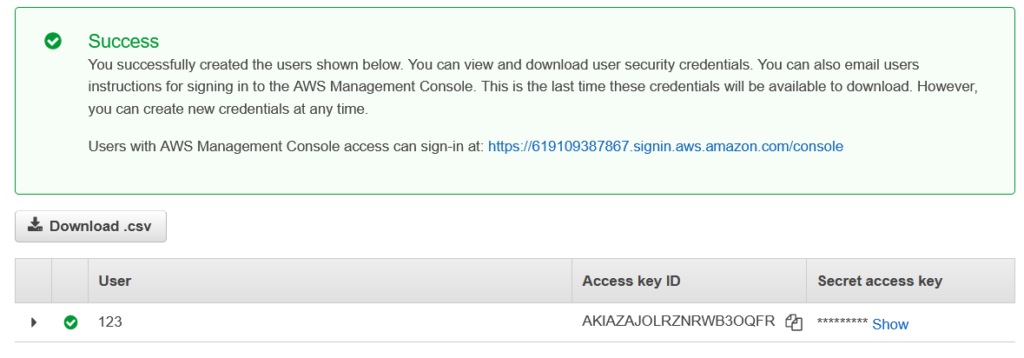
21. Open up a text editor and paste the IP address that you see for later reference. We will continue adding things to this file, so keep it open. Copy the Access key ID and the Secret Access Key to your note file:
Setting Up a Virtual Server on Google Cloud
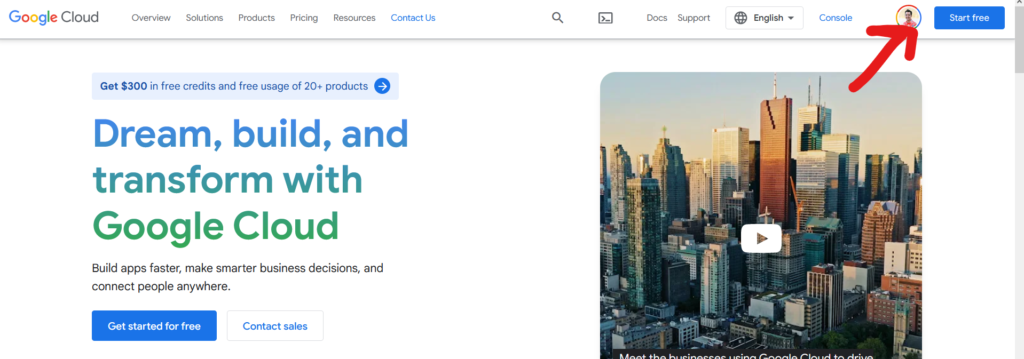
22. Go to Google Cloud and either click ‘console’ or ‘get started for free’ in the top right:
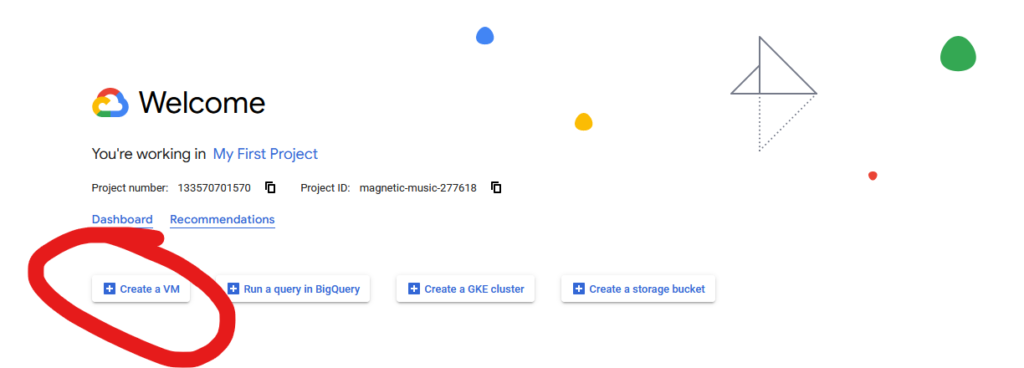
23. In the console, click Create a VM:
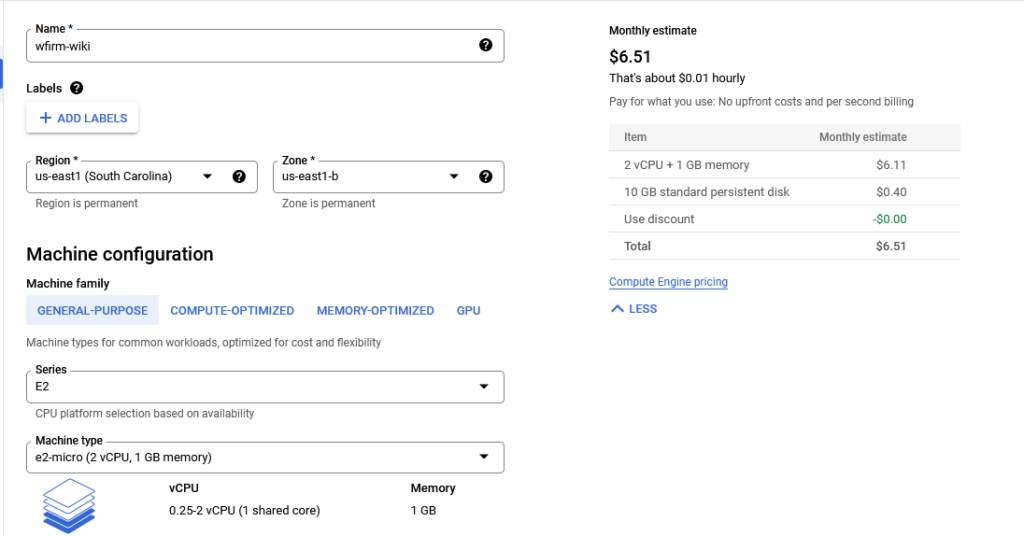
24. Google provides one free server. The current requirements are as follows:
 Compute Engine:

    1 non-preemptible e2-micro VM instance per month in one of the following US regions:
        Oregon: us-west1
        Iowa: us-central1
        South Carolina: us-east1
    30 GB-months standard persistent disk
    5 GB-month snapshot storage in the following regions:
        Oregon: us-west1
        Iowa: us-central1
        South Carolina: us-east1
        Taiwan: asia-east1
        Belgium: europe-west1
    1 GB network egress from North America to all region destinations (excluding China and Australia) per month
Choose the server closest to you when setting up your machine. I used the following settings:
Name: wfirm-wiki
Region: us-east1
Zone: us-east1-b
Machine Configuration
Series: E2
Machine Type: e2-micro
Boot Disk
Size: 30gb
Type: New standard persistent disk
Access Scopes
Allow default access
Firewall
Allow HTTP traffic
Allow HTTPS traffic

25. Once your instance is created, go back to your virtual machine dashboard. Here you will see two important items. First, your external IP. Second, your SSH access tools. Past the IP address into your notes file. When your instance has a green Checkmark under status, you are ready to move on.

Create Firewall
26. In the search bar, type Firewall and select the Firewall settings. Clicking here should take you there directly.
27. Click +Create Firewall Rule:

28. Enter the following settings:
Name: wiki-rules
Direction of traffic: Ingress
Targets: All instances in the network
Source IPv4 ranges: 0.0.0.0/0
Specified protocols and ports: TCP 81,8080,3000,6379,5432

Add User Authentication
Outline offers many methods of authentication. The following links are to the official Outline documentation:
Google
Microsoft
Slack
Email
We are going to use Google Workspace. If you do not have a Google Workspace account, the following instructions will not work.
29. In the search bar, type ‘API’. Select APIs & Services.
30. Select ‘Enable APIS and SERVICES’

31. In the search bar, type “google+” and then select the Google+ API option.

32. Select Google+ API on the next screen:
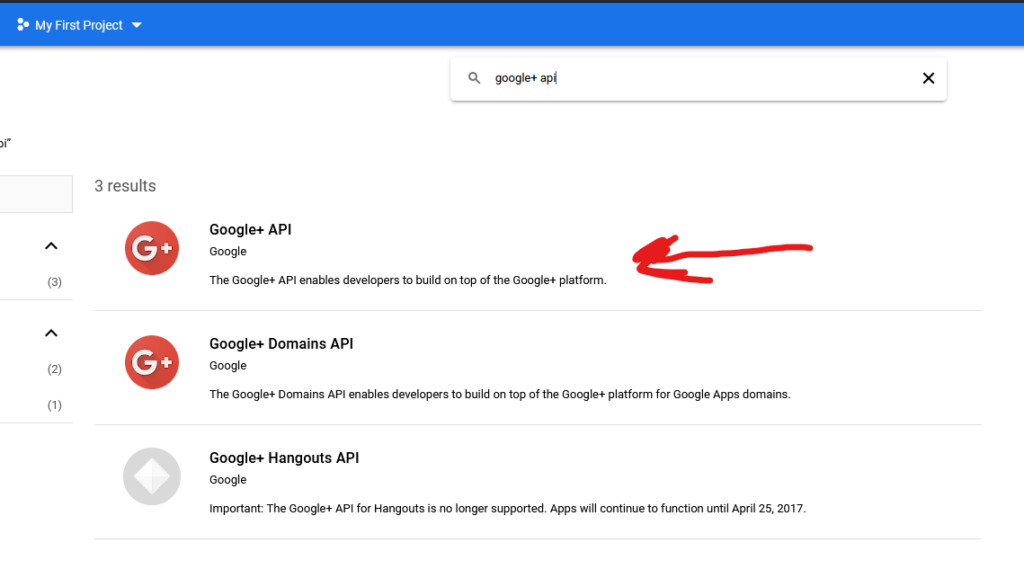
33. On the next screen, select OAuth consent screen from the left side window:

34. Select “Internal” and then click “Create”.

35. under OAUTH consent screen:
App name: whatever your want
User support email: your email
App Domain
Application home page: your domain
Authorized Domains:
enter your domain
Developer contact information
email: your email
Click “Save and Continue”

36. On the Scopes screen, click on “Add or Remove Scopes”

37. Select the first three scopes and click update:
-See your primary Google Account email address
-See your personal info, including any personal info you’ve made publicly available
-Associate you with your personal info on Google

38. Click ‘Create Credentials
39. Scroll to the bottom of the screen and click “Save and Continue”.
40. Click on the “Credentials” link in the left sidebar. Click on the “Create Credentials” button and then select “OAuth client ID” for the credential type.
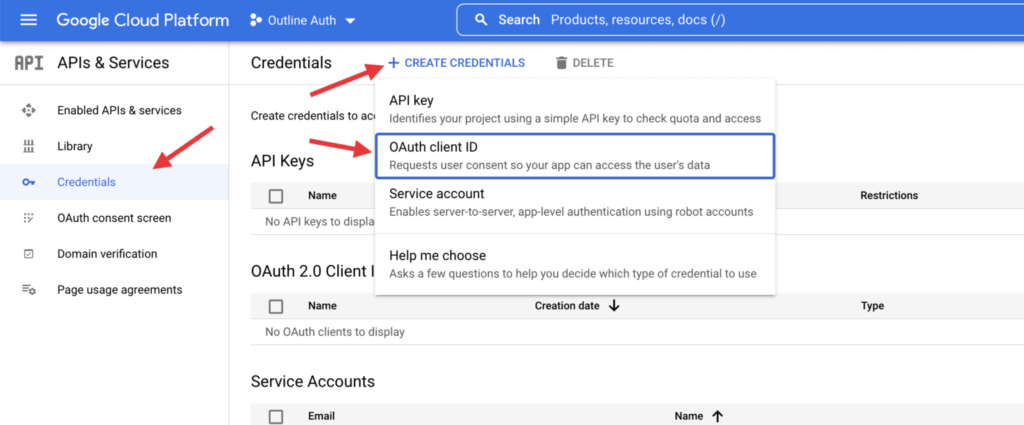
41. Complete the Credentials Form:
Application type: Web application
Name: Whatever you want
Authorized JavaScript origins
URLs: your domain
Authorized redirect URLs
URLs: https://YOURDOMAIN.com/auth/google.callback
Click “Create” to create your new project credentials.

42. On the next screen copy your new Client ID and Client Secret to your notes file.

Accessing Your Terminal and Installing Docker, Nginx, and Outline
43. Now is time to access your terminal. Exciting! If you are familiar with SSH programs and want to use Putty, follow this guide. Otherwise, click the down arrow next to SSH and select view gcloud command:

44. Add the command line code that you see to your notes file.

45. Click ‘run in cloud shell’. It can take a few minutes for the cloud shell to fully provision. When you see a black screen, you are ready to move on.
46. Once the black screen loads at the bottom, give yourself some more space to work by clicking the ‘open in new window’ button:
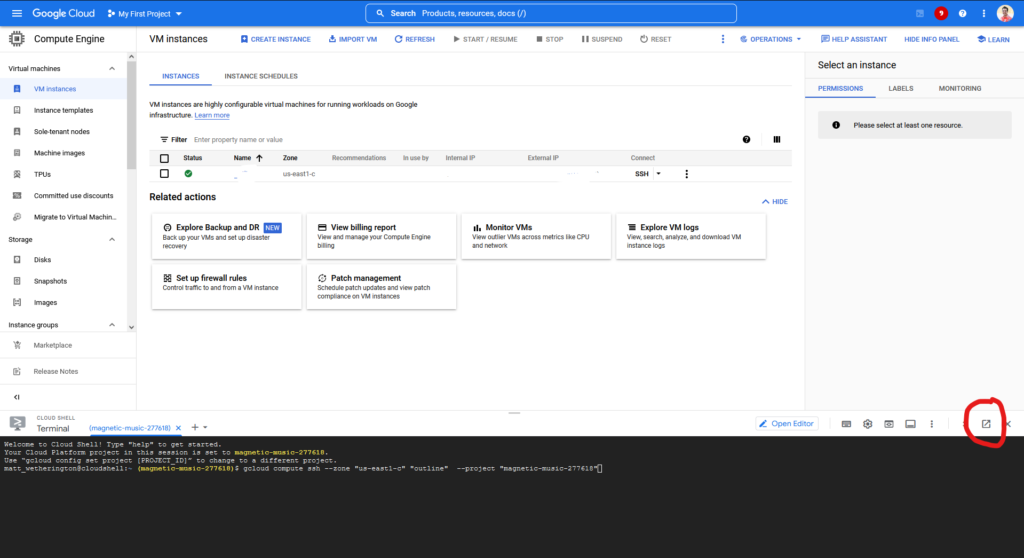
47. Once the page is loaded in fullscreen mode, hit enter at the command line. It will prompt you to create a password. Make it a simple password for now. Type Y and hit enter each time it prompts you. Then, you will see the following screen:

48. Now we are going to go through a series of commands to update the console and preparing your environment for Outline. Start by typing the following, followed by hitting enter:
apt-get update -y && apt-get upgrade -y
Installing Docker
49. We are going to use Docker to install Outline. Docker is a platform that allows developers to package and deploy applications in a lightweight and portable manner. Enter the following command to install Docker, hitting Y each time you are prompted:
sudo apt update && sudo apt install docker-ce-cli containerd.io docker-compose-plugin docker-composeInstalling Nginx Proxy Manager
50. Create a directory for your proxy manager be entering the following command:
mkdir npm51. Enter the directory with the following command:
cd npm
52. Use nano file creator to make your docker compose file with the following command:
nano docker-compose.yml53. Paste the following (without changes) into your terminal:
version: '3'
services:
  app:
    image: 'jc21/nginx-proxy-manager:latest'
    ports:
      - '80:80'
      - '81:81'
      - '443:443'
    environment:
      DB_MYSQL_HOST: "db"
      DB_MYSQL_PORT: 3306
      DB_MYSQL_USER: "npm"
      DB_MYSQL_PASSWORD: "npm"
      DB_MYSQL_NAME: "npm"
    volumes:
      - ./data:/data
      - ./letsencrypt:/etc/letsencrypt
  db:
    image: 'jc21/mariadb-aria:latest'
    environment:
      MYSQL_ROOT_PASSWORD: 'npm'
      MYSQL_DATABASE: 'npm'
      MYSQL_USER: 'npm'
      MYSQL_PASSWORD: 'npm'
    volumes:
      - ./data/mysql:/var/lib/mysql
54. Type CTR+X to exit the editor. When prompted, type Y and hit enter to save the file.
55. Create the proxy server with the following command:
docker-compose up -d56. If you received an error, type nano docker-compose.yml again and check your file for errors. If it looks like the example, try deleting the file with the command ‘rm docker-compose.yml’ and then start over by using this website to remove tabs in the file.
If you don’t receive an error, verify that it worked by typing:
docker psInstalling Outline
57. Navigate back to your home directory:
cd ..58. Enter the following command to create the docker diectories:
mkdir -p docker && mkdir -p docker/logs && cd docker && touch docker.env && touch docker-compose.yml59. Outline requires three hex passwords. Generate them by running the following code three times:
openssl rand -hex 32The output will look like this:

Copy each of the three passwords to your notes file. Label them HEX1, HEX2, and HEX3
60. Now we will create an environment file for Outline. This is the step that causes the most problems. Copy the below text into notepad or similar text editor.
NODE_ENV=production
SECRET_KEY=HEX1
UTILS_SECRET=HEX2
FORCE_HTTPS=true
ENABLE_UPDATES=true
WEB_CONCURRENCY=2

## Postgres Variables
POSTGRES_USER=outline
POSTGRES_PASSWORD=HEX3
POSTGRES_DB=outline
DATABASE_URL=postgres://outline:HEX3@postgres:5432/outline
PGSSLMODE=disable

## Redis Variables
REDIS_URL=redis://redis:6379

## Domain Variables
URL=https://YOURDOMAIN.com
PORT=3000

## Rate Limiting Variables
DEFAULT_LANGUAGE=en_US
RATE_LIMITER_ENABLED=true
RATE_LIMITER_DURATION_WINDOW=60
RATE_LIMITER_REQUESTS=1500

## AWS Variables
AWS_REGION=YOUR_AWS_REGION
AWS_S3_FORCE_PATH_STYLE=false
AWS_S3_UPLOAD_BUCKET_NAME=YOURBUCKET
AWS_S3_UPLOAD_BUCKET_URL=https://YOURBUCKET.s3.YOUR_AWS_REGION.amazonaws.com
AWS_S3_UPLOAD_MAX_SIZE=104857600
AWS_ACCESS_KEY_ID=YOUR_AWS_KEY_ID
AWS_SECRET_ACCESS_KEY=YOUR_AWS_KEY

## Google Login Authentication Variables
GOOGLE_CLIENT_ID=YOUR_GOOGLE_CLIENT_ID.apps.googleusercontent.com
GOOGLE_CLIENT_SECRET=YOUR_GOOGLE_SECRET

MAXIMUM_IMPORT_SIZE=104857600
61. Change the following variables using your notes file:
HEX1
HEX2
HEX3 (two different places)
YOURDOMAIN
YOUR_AWS_REGION (two places)
YOURBUCKET (two places)
YOUR_AWS_KEY_ID
YOUR_AWS_KEY
YOUR_GOOGLE_CLIENT_ID
YOUR_GOOGLE_SECRET
62. In the terminal, enter the following command, which will bring up a text editor.
nano docker.env63. Copy and paste your modified text file into the terminal. Type CTR+X to exit, then Y to save the file.
64. Enter the following command to create the outline docker instructions:
nano docker-compose.yml65. Paste the following code into the terminal. There are no changes needed to this code:
version: "3"
services:

  outline:
    image: outlinewiki/outline:latest
    restart: always
    env_file: docker.env
    command: sh -c "yarn sequelize:migrate --env=production-ssl-disabled && yarn start --env=production-ssl-disabled"
    ports:
      - "3000:3000"
    depends_on:
      - postgres
      - redis

  redis:
    image: redis:7
    restart: always
    env_file: docker.env
    expose:
      - "6379"
    volumes:
      - ./redis.conf:/redis.conf
    command: ["redis-server", "/redis.conf"]
    healthcheck:
      test: ["CMD", "redis-cli", "ping"]
      interval: 10s
      timeout: 30s
      retries: 3

  postgres:
    image: postgres:14
    restart: always
    env_file: docker.env
    expose:
      - "5432"
    volumes:
      - database-data:/var/lib/postgresql/data
    healthcheck:
      test: ["CMD", "pg_isready -U user"]
      interval: 30s
      timeout: 20s
      retries: 3

volumes:
  database-data:
66. Enter the following command:
docker-compose up -dYou should see the following:

If you received an error, type nano docker-compose.yml again and check your file for errors. If it looks like the example, try deleting the file with the command ‘rm docker-compose.yml’ and then start over by using this website to remove tabs in the file.
67. Now that you have a working docker image, make them restart automatically, by entering the following command:
docker update --restart unless-stopped $(docker ps -q)Point Your Website to the Wiki
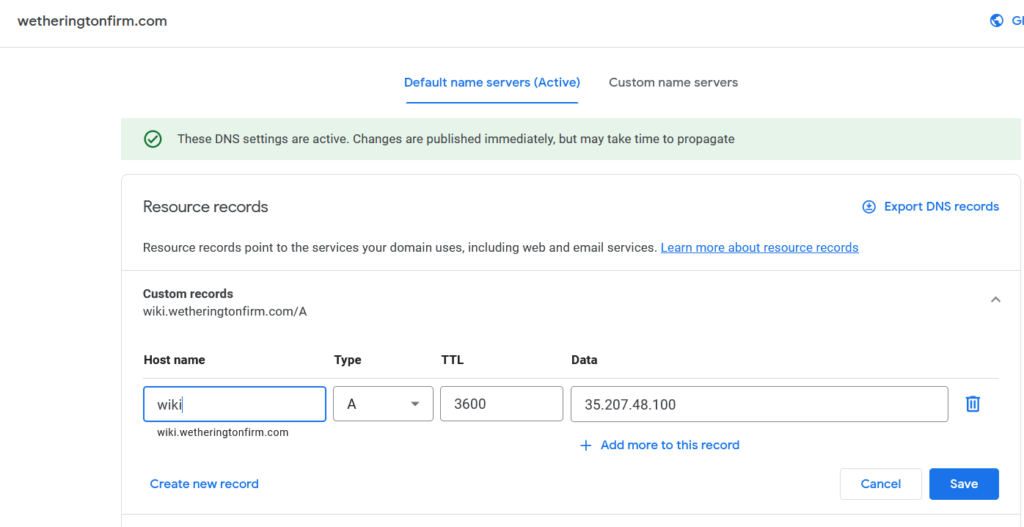
67. You now need to point your domain or subdomain to the ip address for the server. To point your domain or subdomain to the IP address for the server, you will need to create an A Record that points to the IP address. The process for doing this may vary depending on your hosting provider, so it is best to search online or reach out to your marketing company or website designer for assistance. However, in general, you can easily accomplish this by logging in to your registrar and accessing the relevant settings. As an example, here is what the setting looks like in Google Domains using a subdomain of ‘wiki’:
Configure the Proxy
68. In your browser window, type your wiki domain (or the server IP address) followed by :81 and hit enter. For example, mine looks like: https://wiki.wetheringtonfirm.com:81 or 35.190.135.204:81
You should see the following screen:
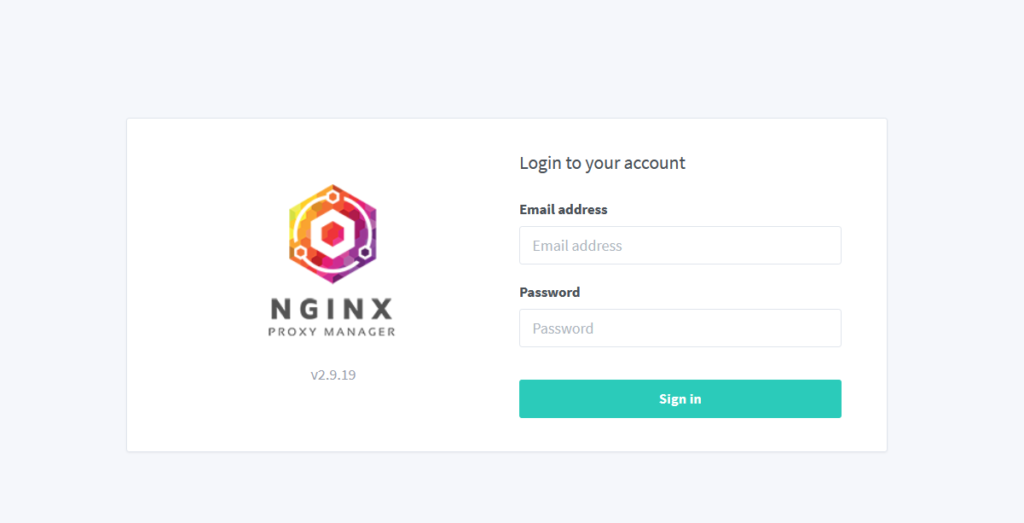
If you don’t see the screen, wait a few minutes and try again. If you still don’t see the login screen, try the following: go back to the command line of your server and type ‘sudo reboot’ Then, follow the instructions in step 8 to re-access the server. Once back in, navigate to the NPM directory ‘CD NPM’, then ‘docker-compose up -d’
69. Login with: admin@example.com, and with the password: changeme.
70. Once logged, click on “Proxy” then “Proxy Host”, and click on “Add Proxy Host”.
Fill in the different fields, as below:
Domain Names: your domain
Scheme: http
Forward Hostname/IP: your server IP address
Forward Port: 3000
Websockets Support: Yes

Don’t click save yet.
Navigate to the SSL tab and select ‘Request a new SSL Certificate’
Force SSL: YES


Click save.
71. Wait a few minutes for these changes to propagate. Then, navigate to your domain name. You should see the login screen for Outline:

Login to begin using your new wiki!
If you would like to explore some additional steps, including creating a slack bot to interface with Outline or adding other features, please check out the following resources:
- Thomas Griffin’s excellent tutorial for installing outline with Digital Ocean
- Tom Jorge’s also excellent guide for installing outline wiki
If you run into problems with your installation, you are welcome to email me, but — as you can probably tell — I am not a coder. Start troubleshooting by reviewing the above instructions and also check out these resources:
Conclusion
Congratulations on making it to the end. If you completed the tutorial successfully, you should be incredibly proud of yourself. Great work!
If you like this content, join the Business of Law Facebook Group where I and other people share similar stuff.